Showing posts with label How to's. Show all posts

Tuesday, January 25, 2011

Uploading Your Artwork Just Got Easier!


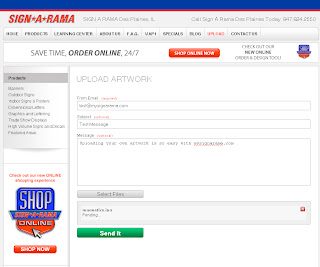
Uploading your own artwork to us at mysignarama.com just got a whole lot easier! With our new "upload" tab, our customers are now able to easily send us their own files right from our website.

Here's how it works:
  1. Click the "Upload" tab located at the top of the page. Since it's a main tab at the top, it's on every page of mysignarama.com.
  2. Fill in your e-mail address in the top field, and if you would like, enter a subject and you can also add a message as well.
  3. Click the "Select Files" button. This will bring up a directory of the files on your computer.
  4. Select the file(s) you would like to upload. You can choose more than one at a time.
  5. Click "Open." You will now see your file(s) appear at the bottom of the web page.
  6. Click the "Send It" button and a progress bar will appear on each file until the upload is complete.
  7. Once your files have been uploaded, you will see a message confirming that your files have been uploaded.
The Upload feature is located along the tabs across the top of every page on mysignarama.com or you can go straight to mysignarama.com/upload

Friday, April 10, 2009

Beware the Bargain!


Being in the sign business for as long as we have, we have come across quite a few different materials over the years. We have seen many companies offering seemingly "too good to be true" prices for their signs. How are they able to sell their signs for such a low price? Let's first start with a little background on the different types of vinyl available.

At Sign-A-Rama Des Plaines, we offer two different grades of vinyl. We offer "intermediate" and "premium". "Intermediate" vinyl is rated as a five-year outdoor material. We only recommend "intermediate" vinyl for indoor applications and short-term outdoor applications. "Premium" vinyl is rated as a seven-year outdoor material. This grade of vinyl should be used on all long term outdoor applications, especially vehicle and window graphics.

Now here comes the kicker... these aren't the only two grades of vinyl out there. There are several quality grades much lower than what we call "intermediate" vinyl. There is three-year outdoor vinyl, two-year outdoor vinyl and even one-year outdoor vinyl. Yes, these grades of vinyl are less expensive, but the quality and durability is much lower as well. The process used to create these types of vinyl makes them much more likely to shrink, crack and fade. We choose not to carry these materials because we feel that quality should not be sacrificed.

Be aware of what grade of vinyl your sign company is using. Many sign companies feel the same way we do when it comes to quality, but that doesn't mean they all do. If you find one of those "too good to be true" prices, find out what kind of vinyl they are using. Ask what the manufacturers rating is for outdoor use. If you get prices from more than one company, make sure they're quoting you for the same thing. Make sure one isn't trying to give you inferior material in order to save money. That's what these grades of material are... inferior. They will shrink. They will crack. They will fade. Bad looking signs reflect poorly on your business.

Caveat emptor.

Sign-A-Rama Des Plaines

Here is an example of a competitor's sign made with inferior vinyl. You can see the peeling edges on the lettering. The background color is also very faded.


Here is a close-up of the lettering... or what's left of it. You can see the dark areas around the letters showing where the vinyl used to be. This vinyl has shrunken severely and the color is running off the letters onto the faded background.

Thursday, January 22, 2009

How to Apply and Care for your Magnetic Signs


Magnetic signs are a great way to transform an ordinary vehicle into a "rolling advertisement" without having any permanent graphics applied to your vehicle. Magnetic signs are easily applied and easily removed. They are very popular for people that use their personal vehicle for work, but still want to advertise their company. They are also popular for people that live or work in areas where "work trucks" are not allowed.

The following article will give you some tips on how to apply and position your magnetic signs to your vehicle. We will also give you some advice on how to care for your magnetic signs so they will last for a very long time.


Applying and Positioning
Applying your magnetic signs to your vehicle is a very simple process as there is no adhesive involved at all. It is literally as simple as sticking a magnet to your refrigerator. Positioning your magnetics, on the other hand, can be a bit tricky. First, clean both the car and the back of the magnetic sign. Soap and water is all you need. To position your sign, we recommend holding your magnetic sign by the sides, allowing it to dip in the middle, forming a "U" shape. Place the center (low part of the "U") first, and then place the sides. This technique better allows you to see if your sign is straight. If you don't like the position of your sign, DO NOT slide your magnetic into place. Sliding it will cause you do drag any debris from the car right across your car's paint job. Simply lift the magnetic off of your vehicle, and reposition it again until you are satisfied.


Care and Maintenance
  • Store your magnetic signs on a flat surface. Keeping your signs on wavy surfaces will cause your magnetics to become wavy, especially in cold weather. If this happens, it is more likely that your signs may come off during driving.
  • Clean your magnetics regularly. Every couple of weeks, remove your signs, and clean the back of them as well as the area of your vehicle that you use your signs.
  • DO NOT drive on the expressway with your signs on your vehicle. Although the bond of magnetic signs is very strong, they are not made to withstand the winds caused by traveling at high speeds.
  • Remove your magnetic signs before going through a car wash. The high pressure hoses, as well as the brushes in car washes can knock your signs off your vehicle.
To order your magnetic signs, visit us at ShopSignARama.com

Sign-A-Rama Des Plaines

Monday, January 19, 2009

How to Remove Vinyl Graphics


The following article will help you remove unwanted vinyl graphics without leaving behind an adhesive residue. With this tutorial, you will be able to take off graphics from any surface, no matter how long they have been on.

1. Heat the surface. Using a heat gun (preferably), or a hair dryer, heat the graphics you wish to remove. Heating them will help make them softer and will allow the adhesive to release easier. This is especially important with older graphics as they become brittle over time.

2. Begin peeling vinyl with a plastic razor blade. Starting at an edge, slide your plastic razor blade under the vinyl until you have a piece large enough to hold with your fingers.

3. Once you have an edge started, pull by hand. Now you can begin peeling the vinyl with your hands. If the vinyl is fairly new, it may come off easily and in one piece. Most vinyl however, will break up into smaller pieces and you will need to pick at it with the plastic razor blade again to continue. If the vinyl is breaking frequently, try using the heat gun again to soften the vinyl.

4. Clean the adhesive. Once your vinyl is completely removed, you will see much of the adhesive has been left behind. You will need to spray this residue with a product such as "goo-gone" to soften the adhesive. Allow this to set in for a minute or so before scraping the adhesive. Take your plastic razor blade and scrape the adhesive. It should come off in a jelly-like consistency. Be sure to remove ALL of the adhesive.

5. Clean the adhesive remover. Once you remove all the adhesive, you will need to wash the chemicals off that were left behind. It is very important that you get all of the chemicals off as vinyl will no longer stick in that area if you wish to replace your graphics. Use a spray bottle with a soap and water mix and wash an area larger than your old graphics to ensure that you clean the area entirely.

Tips and Tricks
When removing vinyl graphics from glass, all of the steps are the same, but a paint scraper can be used instead of a plastic razor blade. As long as you are sure to use a brand new razor blade in your scraper, this can cut down on removal time dramatically. It should also leave behind less adhesive than using a plastic razor blade. This method should only be used on glass however, as a paint scraper will scratch and gouge most other surfaces.

If your graphics were applied to a painted surface, you may still see the outline from your graphics as the sun will have faded the paint, while the vinyl has protected the paint underneath the graphics. This is perfectly normal and, over time, this effect will fade and blend in with the rest of the paint.


1.
2.
3.
4.


1. The edge of the vinyl being lifted with plastic razorblade.
2. Vinyl being peeled up by hand.
3. The adhesive residue left behind after vinyl is removed.
4. The adhesive "jelly" being removed after being sprayed with "goo-gone."


Related article:

How to Apply Vinyl Graphics

Sign-A-Rama Des Plaines

article also avaliable on: eHow.com

Monday, January 12, 2009

Understanding File Types Used in Sign Design


The following guide will help you to get the best results possible when doing your own design for your sign. The most important thing is to have a basic understanding of the two types of artwork.


Raster files - Raster files are files comprised of pixels and are typically found in things like digital photographs and in files created in programs like Adobe Photoshop. Most files found on the internet are raster images as well. Some common file extensions for raster images are: .jpg .tif. .gif .bmp


With raster images, you cannot enlarge your image without getting distortion. As you enlarge the image, you also enlarge the pixels causing a "stairstepping" effect to your image. This is something to keep in mind when creating your file as you will need to start with a large file if you want a large sign. Most images available on the internet are not large enough for use on signs.


Vector files - Vector files are comprised of "lines and curves" called vectors that are, more or less, mathematical equations that represent your images. What this means is that these files can be enlarged to any size without any distortion. These files are most commonly used by graphic designers and in files created in Adobe Illustrator and CorelDraw. Some common file extensions for vector images are: .ai .eps .cdr


With vector images, you do not get the "stairstepping" effect when you enlarge your images. They can be resized to any size and they will not lose detail however high quality design programs that use vector artwork are not as common as those that use raster.


Below illustrates the differences between vector and raster images.


At first glance, the two images appear to be the same quality.


Click image to see detail


As the images are enlarged, you can see the "stairstep" effect in the raster image while the vector image still appears sharp.

Click image to see detail


Sign-A-Rama Des Plaines

Thursday, January 8, 2009

How to Apply Vinyl Graphics


The following steps will help you to apply virtually any vinyl graphic and help you keep it level. These steps will also help you to get the placement of your graphics right where you want it, and keep your graphics bubble-free.

Your graphics will most likely come in three layers: a backing paper layer on the bottom to keep the adhesive from being exposed, the vinyl layer (this is your graphic), and a masking layer on top. The masking layer keeps everything pre-spaced for you to apply your graphic as one piece.

1. Clean your surface! - Always clean the surface first. No matter how clean it looks, its not worth the risk. Without cleaning, you're really just applying your graphics to dirt, rather than to the actual surface. You can really shorten the durability of your graphics by not cleaning first. Simple soap and water will do the trick. DO NOT use glass cleaners or anything with ammonia as this will cause the adhesive not to stick. In the case of vehicle graphics, DO NOT wax your vehicle.

2. Apply small pieces of masking tape to the top of the graphic - Figure A below - Use two small strips of masking tape, one at each side of the graphic, to hold it in place. These small pieces will allow you to reposition your graphic to exactly where you would like. They work as an extra set of hands allowing you to measure the placement of your graphic to make sure it is perfectly level.

3. Apply one long strip of masking tape across the top of the entire graphic - Figure B below - This step will allow the tape to work as a hinge. You will then be able to lift back the entire graphic without losing your placement on your surface.

4. Remove the backing paper - Figure C below - Now that your graphic is folded back from your surface, you can peel the backing paper off. Peel slowly to ensure that none of the graphics stick to the paper.

5. Squeegee the graphics into place - Figure C below - Slowly, in a side-to-side sweeping motion, use your squeegee to press your graphics down into place. Go slow and overlap your previous pass to ensure that you don't miss any spots and get bubbles.

6. Remove the masking layer - Figure D below - Now that your graphics are applied, you can remove the masking from the top of the graphics. Pull slowly to be sure that none of the graphics come off with the masking. Pulling diagonally across the graphics will help keep them on.


Tips & Tricks

Some surfaces require a little extra preparation ahead of time. Freshly painted surfaces should allow one week to dry before applying graphics. Metal surfaces should be cleaned with a solvent cleaner, such as Prep-Sol, as well as soap and water, before applying graphics.

Temperature can affect your application. It needs to be above 40 degrees F or the adhesive will not stick. Graphics can be applied in very warm conditions, but are more likely to become "stretchy" during application in extreme heat.

Wet and dry methods - Graphics are typically applied to a dry surface, but for beginners it is common to wet the surface first. Once you complete step 3, you can fold the graphic away from the surface and peel back the backing paper. With a spray bottle, wet both the surface you're applying the graphics to and the exposed graphics. Use water with a small amount of soap. DO NOT get the backing paper wet. With the graphics wet, you now have a chance to lift the graphics back up if you don't like how the application is going. All of the application steps are the same, however you will need to wait until the graphics are dry before removing the masking.


Related article:

How to Remove Vinyl Graphics

Sign-A-Rama Des Plaines